Overlays are getting very famous these days. It turns a simple image into something astounding. Photoshop with the help of its finest tools it allows us to manipulate any image and add any sort of overlay to it. This enhances the beauty of the image and acts a photo filter.
You can use also create many different kinds of effects in Photoshop. Like the soft glow effect, this effect increases the beauty glow on any fashion or bridal images. As Christmas is coming most of you would like to add some Christmas light bokeh overlay to your photos. You can find many free bokeh overlay for Photoshop elements all you need to do is download a photo of a bokeh you want to add to the background of your image and then follow the steps that I’m going to provide below.
Hopefully, these steps will guide to you properly to add bokeh overlay Photoshop easily. So without waiting further let’s start!
Open the Photo
Photoshop is a part and parcel of photo editing. To edit photos in Photoshop, the first step you need to follow is to opening an image in Photoshop. Without opening the photo in Photoshop, you cannot edit photographs. Open Adobe Photoshop in your windows and click on File>Open. You will get a dialogue box of windows from where you need to go to the required drive and select the photo. Click on the photo and press enter or click on select. The photo will appear on the screen of Photoshop.
Another easy thing you can do to open the photo which will take only a few seconds. Go to the windows drive and open the file location. Click on your required photo and drag the photo into the Photoshop bar. It will take a fraction of second to import the photo in Photoshop.
![]()
Open the Bokeh Image
Now we have to open another image which is the bokeh image on top of the main photo. Go to File>Place and choose the image from the windows drive and press enter or click on ok. Doing that, you will get the bokeh image over the main image.
![]()
Change the Blend Mode to Lighten
In this step, you have to go to the layer panel and click on the bokeh layer. Now go to the blending mode on the up of the layer panel and click on the Lighten. As we want to blend the bokeh image with the main image, that’s the reason we have chosen the lighten mode.
![]()
Create a Layer Mask
The next thing you need to do is to create a layer mask. Click on the bokeh layer and click on the vector mask right in the down the layer panel. There is a circular icon downside clicking in which a vector mask will be added to the bokeh layer. You will get to see the vector mask next to the bokeh layer.
![]()
Use Brush to Remove Unnecessary Bokeh
As we got the bokeh over the main photo, you can see that there are some unnecessary bokeh in the face of the image. We need to remove those unnecessary bokehs from the photo. For that we need to use the brush tool. Select the brush tool from the tool bar by clicking on the brush icon or press ‘b’ on the keyboard to activate the brush tool. Set the foreground color to black and select the layer mask. Now rub the brush tool to remove the extra bokehs. It will clear up the unnecessary bokehs from the photo. You can also use a clipping path to remove the background from the image if you want to.
![]()
Use Color Balance to Adjust the Colors
In the last step, we need to get the right color balance. And it is an adjustment layer that will help up to get the right color on the photo. So click on the adjustment layer in the down. You will get many options. From there, click on color balance. You will get an adjustment slider by which you can adjust the color of the entire photo. Use the slider and stop when you get the right color balance.
![]()
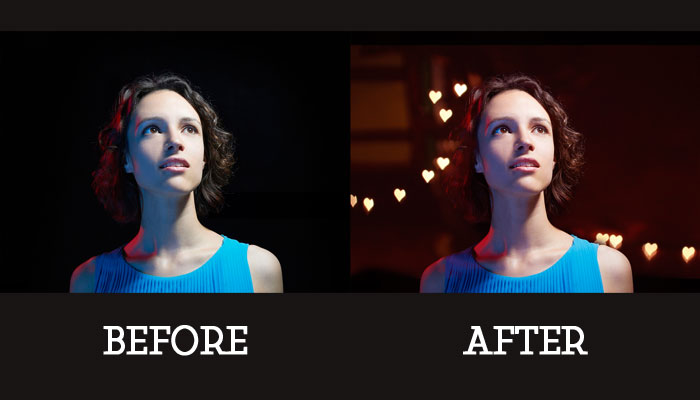
Before-After
Here is the final photo before and after adding the bokeh overlay for Photoshop.

Conclusion
Adding overlay is very easy if you follow the steps I’ve provided. You can easily add any sort of overlay using the blending modes and the brush tool in any of your photos. You can also add cool backgrounds to your photos without using the background removal service simply using this adding overlay technique. So use it well and enjoy photoshopping.


