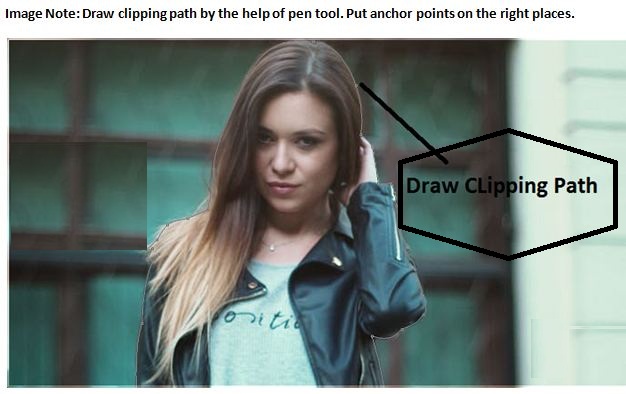
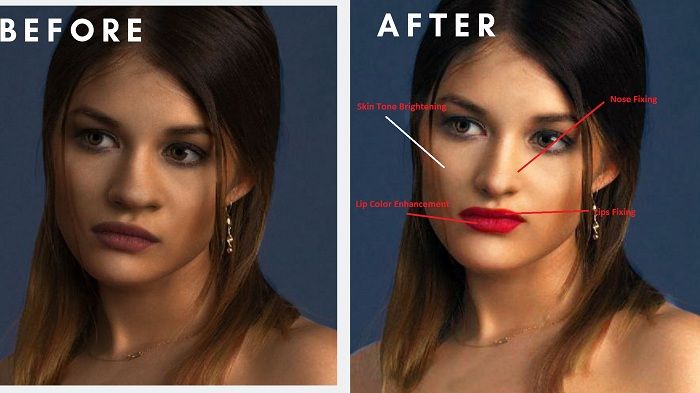
One thing almost every professional photographer says is that “background is the most essential part for any type of photography genre”.
Why do they say this? It’s simply because they want a clear view of the product or model and only a clean background shows a clear view of the subject.
Now the thing is that there are different types of backgrounds like a solid color, patterns, gradients, etc but which one is the best for showing every inch of that subject with clarity?
90% research shows that white is the only background that clearly shows every inch of the subject.
This is why ecommerce websites, news ads, catalogs, etc uses white backgrounds. It helps the customers to judge the products or services and helps them decide whether to purchase or not. They take help from professional photographer and clipping path service provider but, you can also do it by yourself.
Therefore, in this article we’ll show you the ways by which you can change photo background to white of the most popular types of photography you like using Photoshop.
These tips will definitely make you a Pro! So why wait? Let’s start!
Change Background to White for Product Photography:
Products are meant to be sold. Almost every company uses the marketing strategy through product photographs to sell their products. To make the products look best, the product companies go for different photo editing services, Background removal service is one of them. A background makes a product photo look good. If it is a white background in the product photo, the product photo will pop out because of the white background.
There are two different types of products. One is simple, another is complex. Both clipping path services are taken by product companies. We are going to show you how you can remove the backgrounds of simple and complex product images and change background to white. Here we go.
Change Background to White for Simple Product Photography
There are different types of product images. For different types of images, different methods of background removal techniques are applied. One of them is simple background removal technique. Simple background removal is very easy. We just have to draw few straight and curve lines to remove the background. Let’s check out the step-by-step process of changing background to white of simple product photography.

Opening the Image in Photoshop
The first and thing we have to do is opening the photo in Photoshop. Opening the photo also means importing the image. Importing word is mostly used in professional photo editing world. There are two ways of importing or opening the image. One is Automatic, another is manual.
The easiest way of importing an image in Photoshop is the automatic way. You just have to go to windows and find out where your photo is. After finding out the photo, you just have to drag the photo into the Photoshop bar. Doing that, the photo will be opened automatically. It takes only a few seconds.
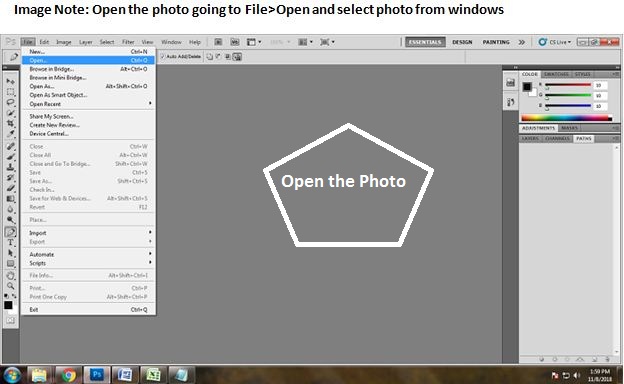
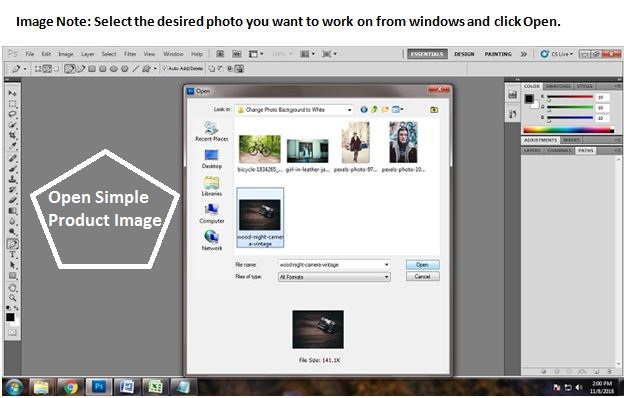
Other way of opening the image is to is go to File>Open. Select the photo from the windows box you will get. Click on the desired photo and press enter. The file will be opened.
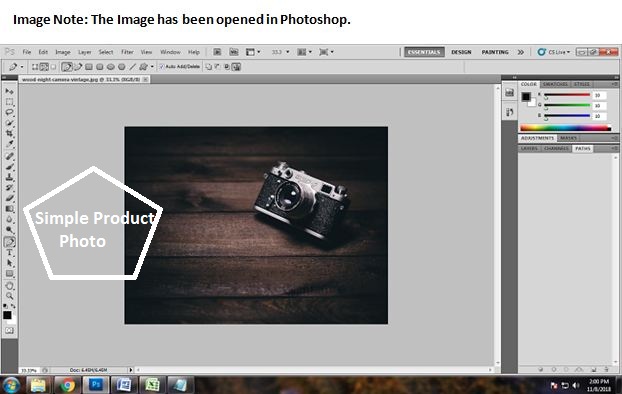
Take Path Layer
After opening the photo into Photoshop, you have to take the ‘Path Layer’ to move to the further step. We are going to draw clipping path on path layer. To take the path layer, go down to the layer box and click on the square icon in the second last from the left. You will get a path layer doing that.
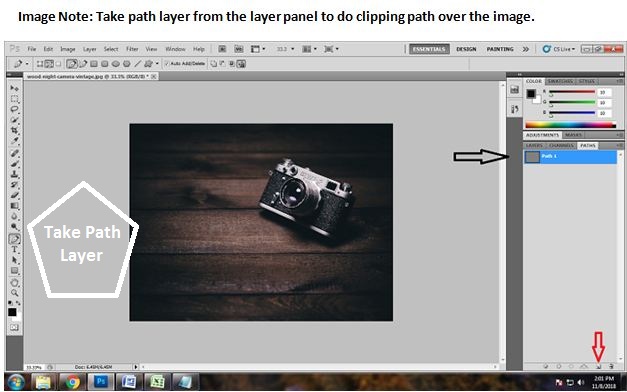
Draw Clipping Path
The main thing begins now which is drawing the clipping path of the object. Here, we have selected an image of a camera as a simple object. It has straight lines and a few curves. We have put anchor points where they are needed. Close the path with the anchor points after drawing the clipping path.
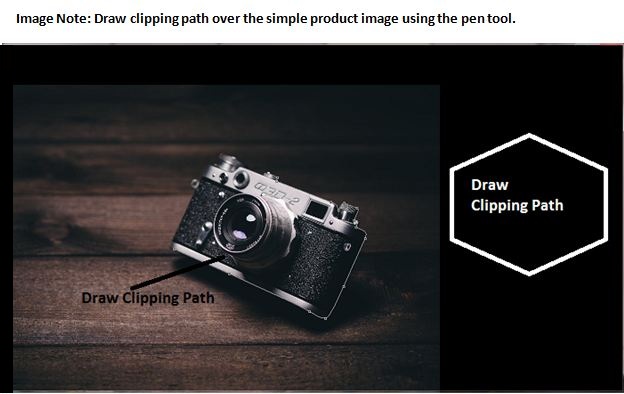
Make the Selection
Since we have created the clipping path of the camera image, we have to make the selection of the clipping path we have drawn. Click on the path layer and press ctrl+enter on the keyboard to make the selection. The entire selected part of the clipping path will be selected by doing that.
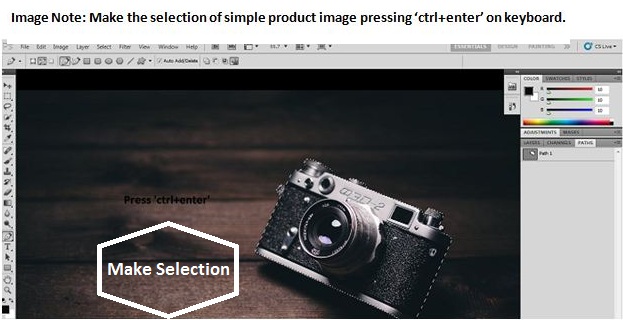
Remove the Background and Change Background to White
In Photoshop, the color of the background usually remains white as it is the default color. So we do not have to change the color. We just have to press ‘q’ on the keyboard right after making the selection of the simple product photo.
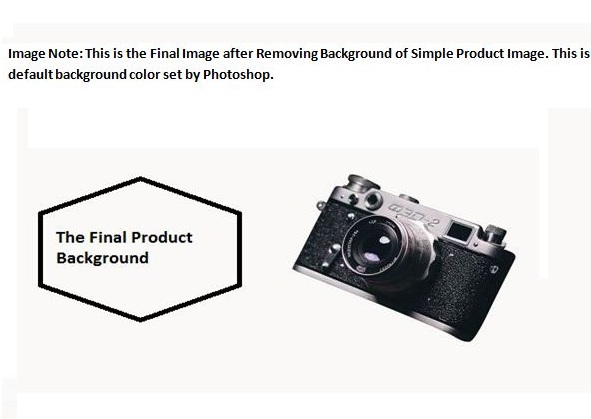
Change Background to White for Complex Product Photography
Complex product photography is also there in the types of product photography. Removing the background of the complex product photographs and make the white background is difficult. In a complex product image, you will find many curves and many loops which are difficult and time consuming to do. But for you, we are showing you the pictorial process for making the background white of the complex product image below.
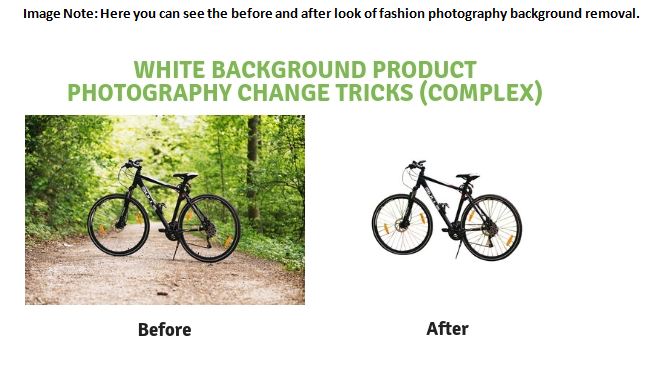
Open the Photo in Photoshop
As we have discussed on the previous technique of converting background to white of simple product photograph, we have to open the image at first in the Photoshop to switch the background of complex image too. t is your choice if you want to open the photo in automatic way or manual way. So, open the image as you want. I would recommend you to open the image in automatic way. It saves your time. Just Drag the photo to open the image or go to File>Open to bring the photo in Photoshop.
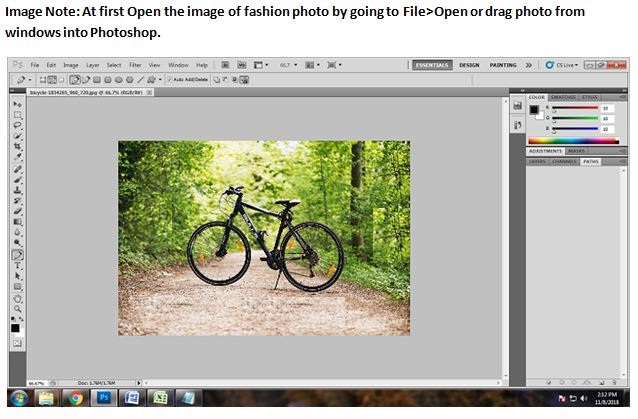
Taking Path Layer
For changing the background into white, working on path layer is must. So, take the path layer from the layer box on the bottom. Click on the square icon to activate and to bring the path layer.
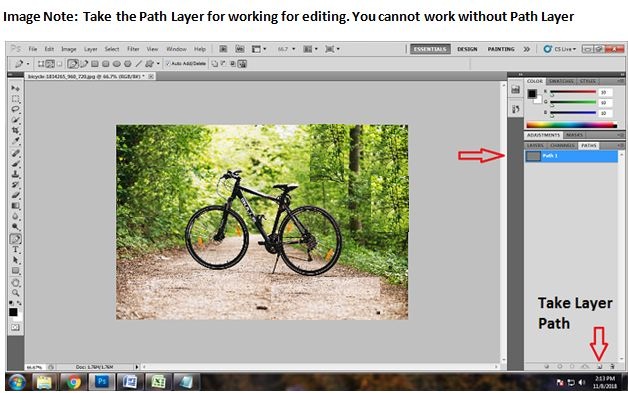
Drawing Clipping Path
Clipping path is the main technique by which you can remove or change the background. Use pen tool from taking from the tool bar and draw clipping path on the complex product image. We have drawn the clipping path with the help of pen tool here in Photoshop. Here, we have drawn path of the entire outline and all the loops. Make sure that none of the area of the subject left.


Making the Selection
After drawing the path of the entire outline and all the loops, it is time for the quick selection of complex product image to change the make the white background. Click on the path layer and press ctrl+enter on the keyboard to make the selection. All the parts of the complex product image will be selected by doing that.
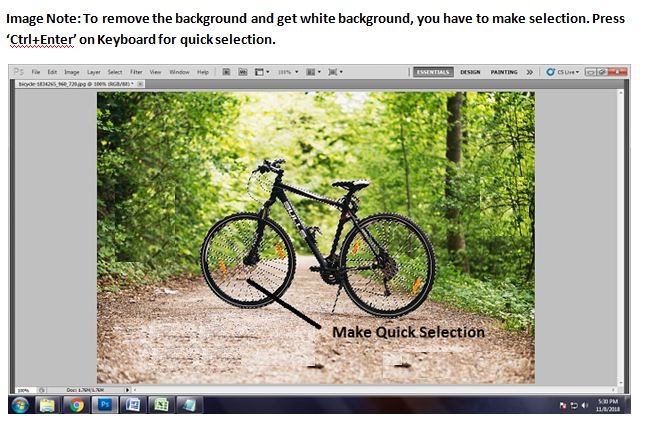
Removing the Background and Changing Background to White
Now, we have come to the last part of converting the background to white of complex product image. Since, we are done with the selection part, press ‘q’ to remove the background. You will get the white background as it is the default background color.
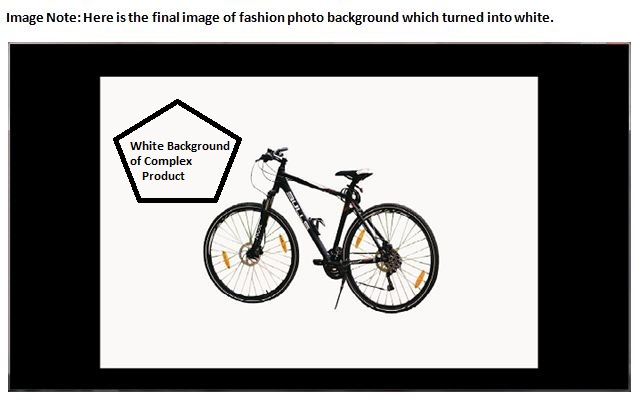
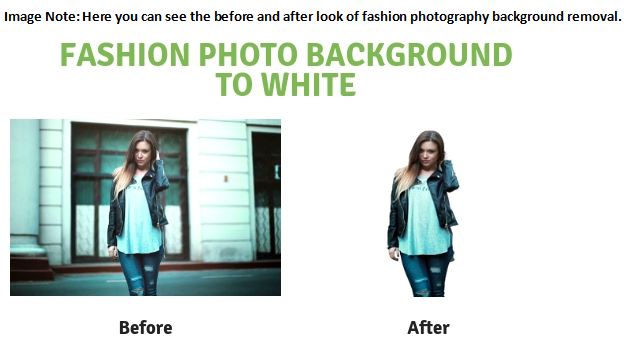
Change Background to White for Fashion Photography:
Fashion photography is something which has to be very classy and elegant. Sometimes the photographs may get extreme. In a fashion photograph, the background is very important. If you notice, white background is used the most in fashion photography. Sometime, you may not get the white background. So here I am discussing below on how to change the background of fashion photography and makes it white.
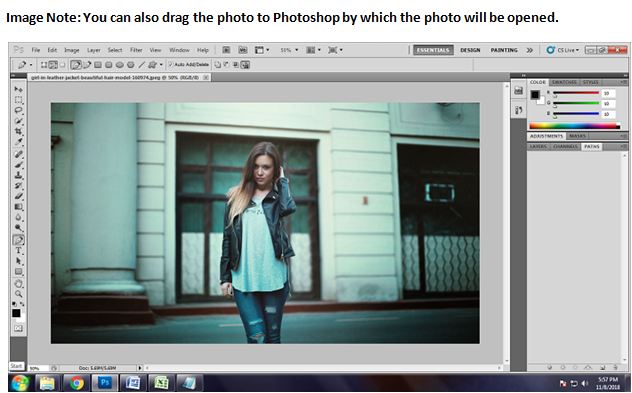
Import the Image
You cannot edit an image without opening it into the Photoshop. So, the first thing you have to do is importing the fashion photo into Photoshop. Either import the photo going to File>Open or drag the photograph into the Photoshop by dragging the file.
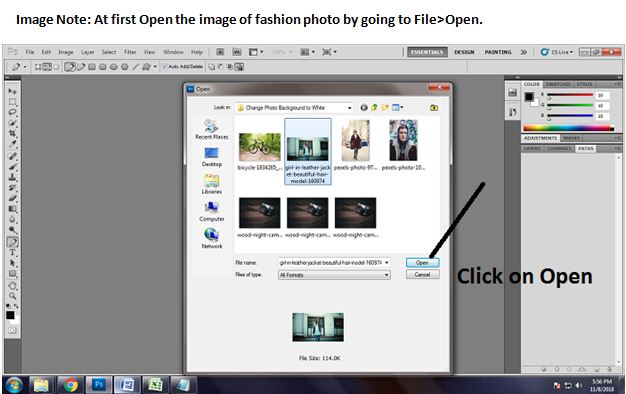
Create a Path Layer
To change the background to white, you have to go for clipping path. And to draw clipping path, you need a path layer to work on. So take the path layer from the layer panel and start working.
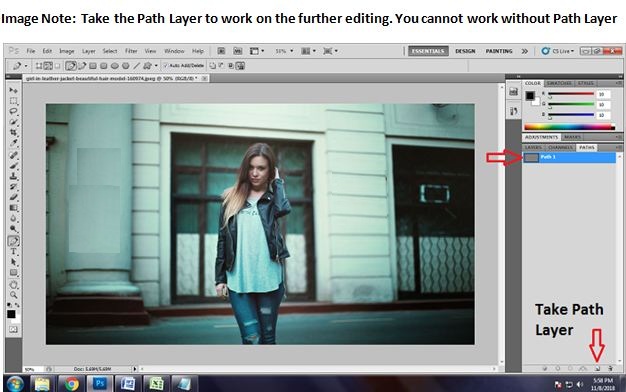
Making Clipping Path
One of the best techniques of removing the background and converting the background into white of fashion photography is clipping path. It is also known as background removal technique. As we have taken the model, we have drawn the clipping path very carefully. Each and every detail should be covered perfectly. From head to toe, draw the clipping path.
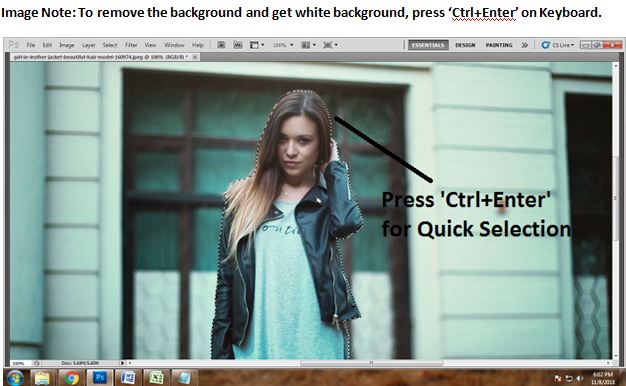
Selection Making
When you are done with drawing the clipping path of the fashion model, make a quick selection right after drawing clipping path. Click on the path layer and press ctrl+enter on the keyboard to make the selection. All the parts of the complex product image will be selected by doing that.
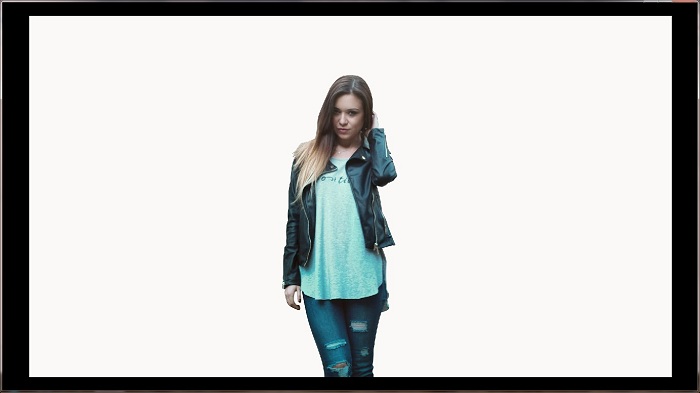
Removing the Background and Changing Background to White
After making the quick selection, it is time for getting a new white background of the fashion photography. Since, we are done with the selection part, press ‘q’ to remove the background. You will get the white background as it is the default background color.
Change Background to White for Portrait Photography:
Portrait photographs usually tell many stories. The focus of a portrait photograph should be specific. So the background should also be perfect. If you are having a disturbing background in the portrait photography, you better make the background of the portrait photograph white. Here is the process of making the background white of Portrait Photography.
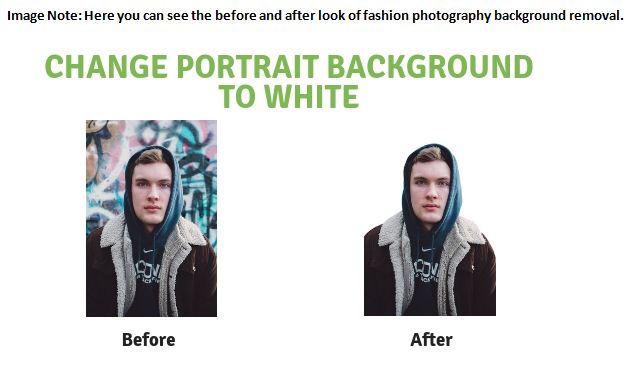
Open the File in Photoshop
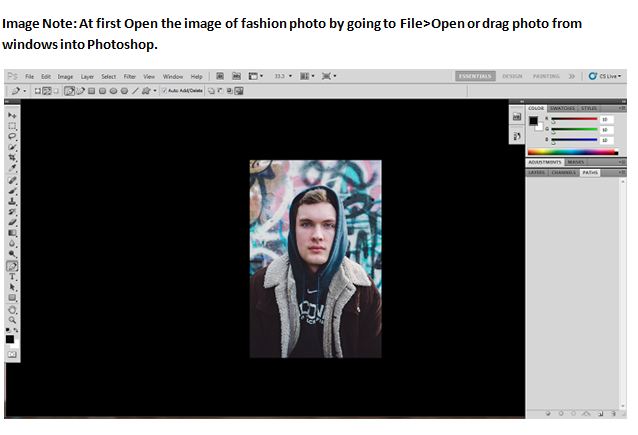
As we have discussed in the last few types of photography background removal, here you have to do the same thing at first. So open the image in Photoshop by dragging into Photoshop or opening it by going to file>open. The choice is yours.
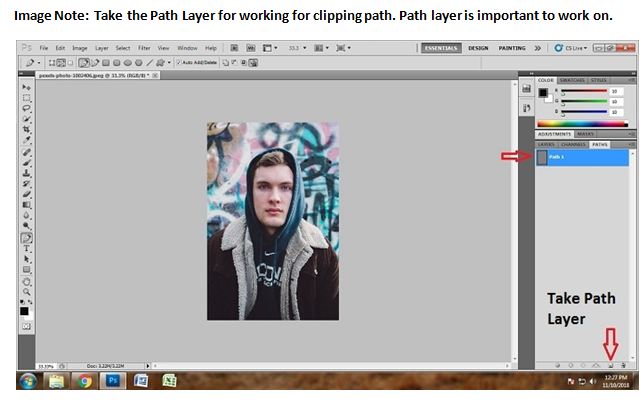
Path Layer
Take a path layer from the layer bar to draw the clipping path on the portrait photograph we have taken. Choose the path layer like we did it before.
Draw Clipping Path
After creating the ‘path layer’, we have to draw clipping path on this portrait image. Activate pen tool by pressing ‘p’ on keyboard or click on the pen icon from the tool bar. Draw clipping path without leaving a space of the portrait image.

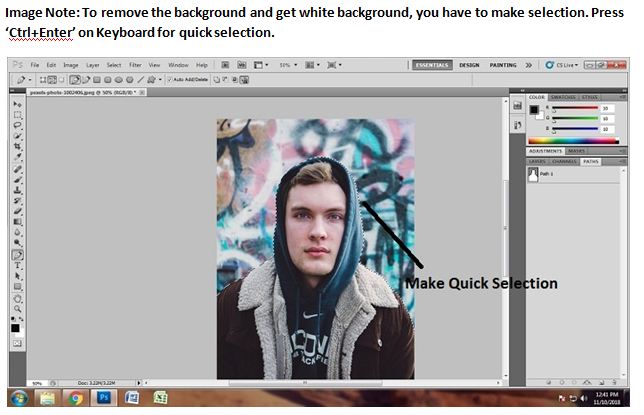
Quick Selection
To remove the background, make quick selection of the selected path area. Click on the path layer and press ‘ctrl+enter’ to make quick selection.
Changing the Background to White
Press ‘q’ to remove the background and get the white default background of the portrait photo by doing so.

Change food photography background to white
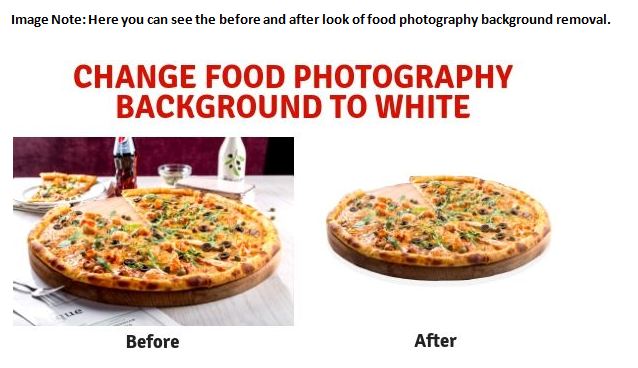
One of the most popular types of photography is none other than Food photography. Many restaurants and chefs wants to advertise their foods to gain customers using leaflets, banners, catalogs , menus, social media posts, etc.
So, it is necessary to keep a white background for food photography as white backgrounds attracts a great number of customers. Photography also fails sometimes to achieve a pure white background that’s when we use Photoshop to remove background of the product and replace it with white. In the following steps we’ll show how you can use clipping path to change background of a food photograph.
Open the Photo in Photoshop
The first step is to open the food photograph in Photoshop. To do that go to the File > Open and select the food photo you want to edit from your PC drives. Opening an image will give you a new layer which is called a background layer. This is the layer we’ll use to cut out the food image from the background.
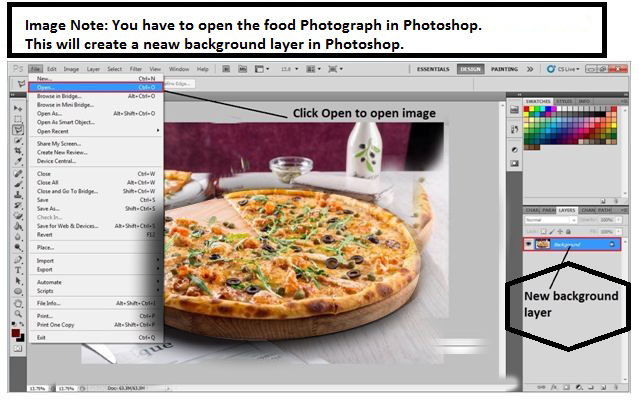
Create a new Path layer
Next step is to create a new path layer from the path layer tab. This will help us to draw and select the outlines of the food photo using pen tool. To do so go to the layer tab and there will be another tab over there known as Paths, click on that tab and you’ll see a box type icon at the bottom of that tab, click on it to create a new path layer.
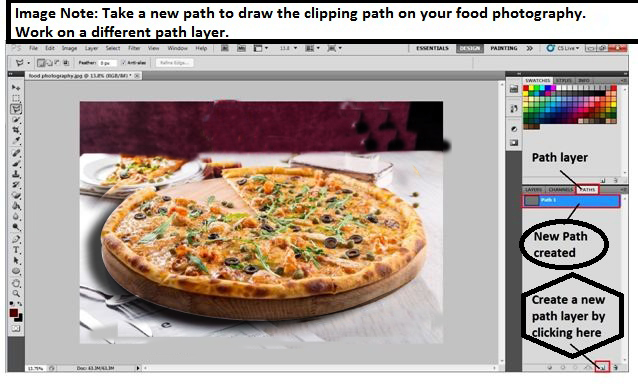
Draw anchor points over the subject
Now that you have selected the pen tool it’s time to draw anchor points over the food image which will make a path on it. To do so use your mouse, the left button will help you create an anchor point and moving the mouse holding the left button will help you bend the path. This way you can easily draw a path over the image.
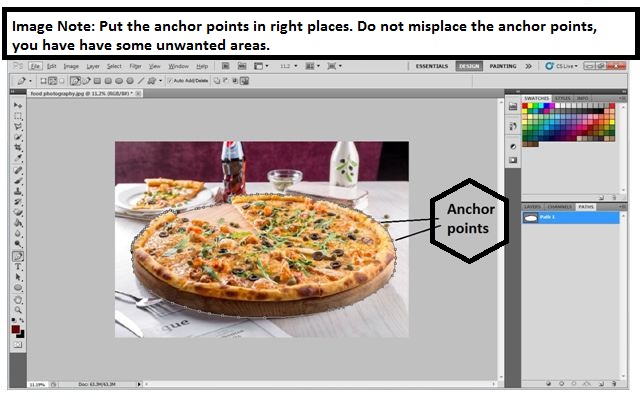
Select the Path
Then we need to select the Path for removing the background from the subject. To do so go to the path layer and right click on the Path 1 layer then choose the selection option from the drop down menu. This way your path will get selected.
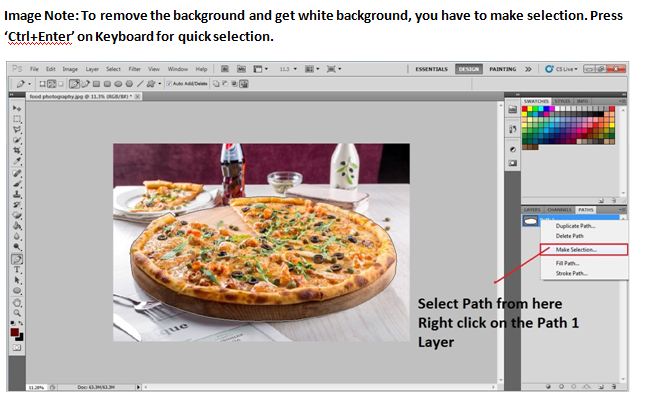
Make a Transparent Background
After selecting the area, hit Ctrl + J to remove the background from the subject. This way you will get a transparent background of the food and then you can easily change the Background color to white using a solid color adjustment layer.
Create a new Solid Color Adjustment Layer
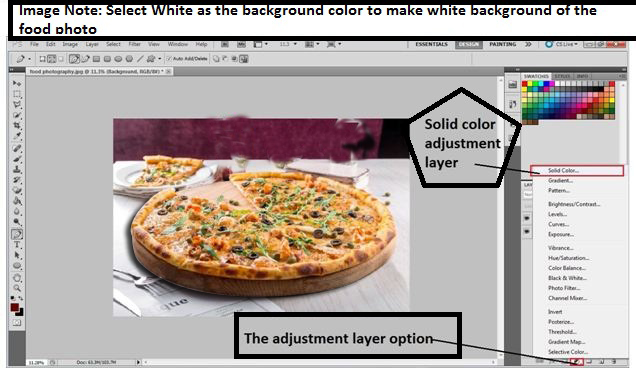
Now the final task is to make the background color white. To do so, go to the adjustment layer option and choose the solid color adjustment layer and choose the white color from the color gallery. This way the background will become white. Then give it a final touch by setting up its position according to you.
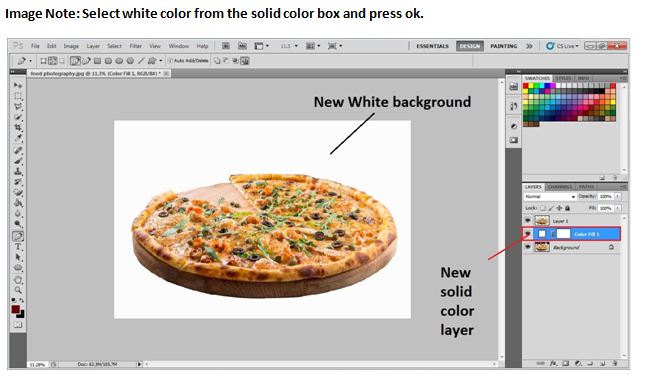
The final image will look like this

Change Real Estate photo background to white
One of the most fast rising industries at present is undoubtedly the real estate industry. Its market has rose to $4263.7 billion from $3505.2 billion which is like 18%.
People are buying and selling real estate’s every day. In this industry there is also a demand for a clean image of the building or house they are selling. Customers decide which house to buy depending on the image of that house which they see in ads and other online websites.
Therefore to make the house images look clean and attractive it also needs to have a white background. So, now we are going to describe the steps that you will need to remove the background of a real estate and change its color to white using Photoshop. Here are the steps –

Open the Photo in Photoshop
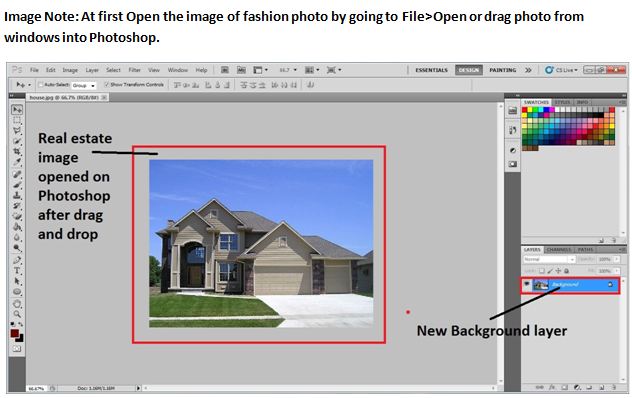
As I’ve told you before there is a way of opening the image by File > Open but, there is also another way by which you can open it. You can just simply drag and drop the image from your PC. A new background layer will also get created here automatically.
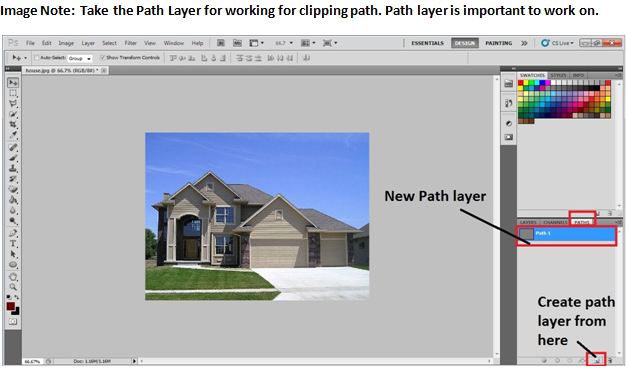
Create a Path layer
Again we will need a path layer to select the path of the house from the whole scene. So to create a path layer, go to the layer tab and there will be another tab over there known as Paths, click on that tab and you’ll see a box type icon at the bottom of that tab, click on it to create a new path layer.
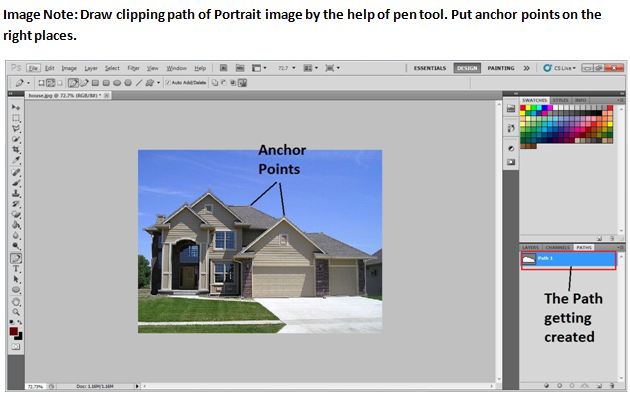
Draw anchor points over the subject
Pen tool as always creates points around the real estate image and without anchors you really cannot create paths. So, to create anchor points use your mouse, the left button will help you create an anchor point and moving the mouse holding the left button will help you bend the path. This way you can easily draw a path over the image.
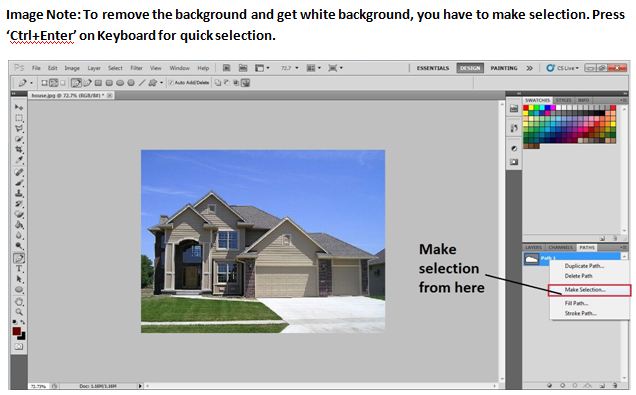
Select the Path
You cannot subtract the background without selecting the path. Therefore to select the path go to the path layer and right click on the Path 1 layer then choose the selection option from the drop down menu. This way your path will get selected.
Make a Transparent Background
As before to remove the background from the real estate image you need to hit Ctrl + J. This way you will get a transparent background of the real estate and then you can easily change the Background color to white using a solid color adjustment layer.
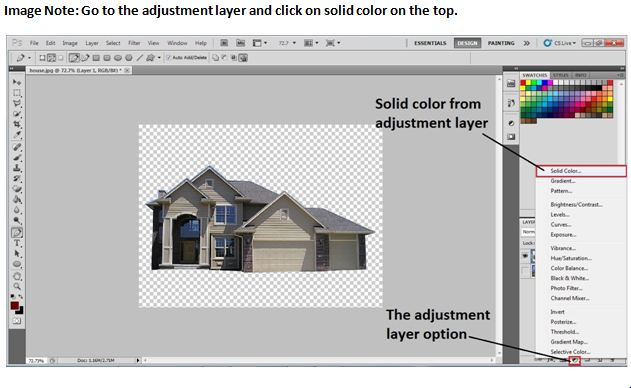
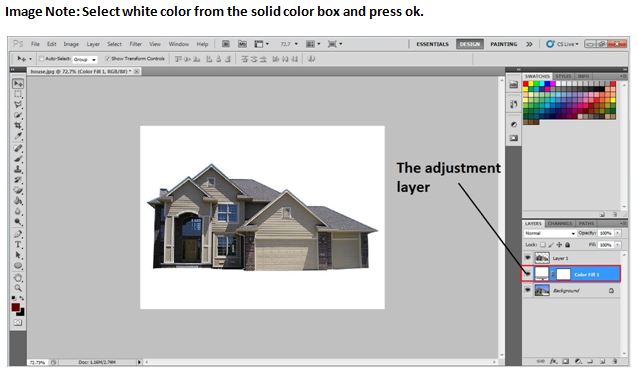
Create a new Solid Color Adjustment Layer
To make the background layer white you need to use a solid color adjustment layer. For that, go to the adjustment layer option and choose the solid color adjustment layer and choose the white color from the color gallery. This way the background will become white.
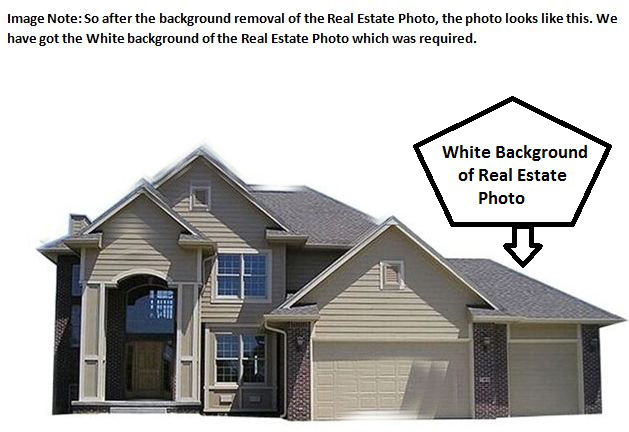
The final image will look like this
Conclusion
There many other ways also for removing the background any image and changing its color to white but, Using a pen tool on Photoshop gives the best results.
It has also been proved through data analysis that image boosts conversion rates for any type of industry. An image with white background will also help you maximize your revenue and profit.
These steps will help you to remove the background smoothly with no extra hassle.


