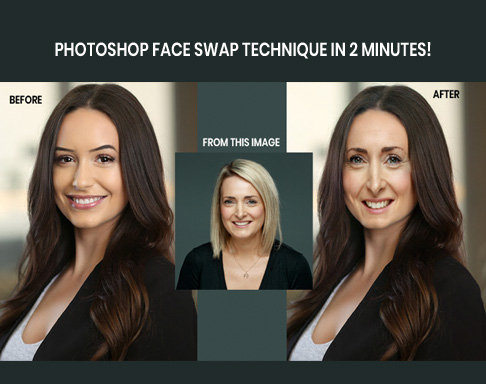
Photoshop is such a cool tool or software for photo editing which you can use to do extensive bulk work as well as you can have fun with it. You can process images, design graphics; etc you can also create a bokeh overlay on image or in this case you can also swap faces with photoshop. It is very easy and fun to do face swap photoshop, because all the tools you need can simply be used and you’ll also be able to make the end photos funny too. In this article we’ll show you the method of doing Photoshop face swap. We’ll show you the easiest method for swapping faces in photoshop in no time. So, without further adieu, let’s start!
Here are the steps for how to photoshop face swap or in other words how to swap face in photoshop –
Open the Photo
![]()
As we are going to Photoshop face swap a photo, we need to choose the best photo editing application. Here, we have chosen Photoshop to do face swap editing. At first you need to open the photo in Photoshop. We will be working with two different photos as we are going to swap faces photoshop. To open the photo, go to Photoshop. Go to File>Open. Doing that, you will get a windows dialogue box, from there you have to go to the file location and select the photo. Click on the photo and press enter. The photo will be opened in Photoshop.
You can also just drag the photos into Photoshop bar from the file location. Photoshop will open the photos in a second if you do so. Another easy way to open the photos in Photoshop is pressing ‘Ctrl+O”. You will get a windows dialogue box to open the photo. Select your photo and press enter to open the photos. Then we’ll start face swapping in photoshop.
Select the Area of the Face you want to Swap
![]()
It is time to select the area of the first face photo. We need to activate a selection tool. There are different selection tools in Photoshop. But we are going to work with the “lasso tool”. We have to activate the lasso tool at first. Press ‘l’ on the keyboard or click on the lasso icon from the tool bar. Doing that, you will get the lasso tool activated in Photoshop. Now we are going to select the area of the face we want to swap with the help of lasso tool. Now draw a circle on the first face photo. You will get the area of the face photo selected. This will help you to Photoshop face swap easily with accuracy. You can also use a clipping path for selecting the portion of the face.
Copy the selection
![]()
As we have already made a selection of the face of the first photo, we need to copy this area of the face photo to swap on the second photo. To copy the selection, right click on the selection and you will get the dialogue box containing some options. Click on ‘copy’ from the box and the area will be copied. Photoshop face swap can be a bit imperfect if you don’t copy the selection properly.
Paste the selection on the second image
![]()
To do Photoshop face swap, we need to move the other face on the other one. Now we need to go to the second photo. As we have copied the face area of the first face photo, we need to put it on the second photo’s face. Press ‘ctrl+v’ and paste the face of the first photo to the second photo.
Reduce opacity and resize the new layer of the face
![]()
After putting the face photo over the second image, we need to blend it perfectly. We need to resize it and decrease the opacity of that image area. Click on layer 1 and work on it. In the layer box, you will see the opacity on the top right of the layer panel. Reduce the opacity to 57%. Not stretch in the area of the first face. Adjust it in the right place and you will get it almost done. This will help you to properly do Photoshop face swap.
Duplicate the background layer
![]()
While you are doing face swap with photoshop it is necessary to keep the image as much non destructive as possible. This is why duplicating the background layer and using it as the main layer to work on will give you a heads up and the work will be non destructive keeping the main faceswap photoshop image safe. To duplicate the background layer go to the layer box and choose the background layer, then right click on the mouse and choose layer via copy from the options. You can also select the background layer and press ‘Ctrl+J’ to duplicate the background layer and do Photoshop face swap technique with perfection.
Make a selection of the face layer
![]()
Now make a selection of the new face layer again. This is that same face area that we had taken from the previous image. Make a selection of this face layer again. To make the selection press ctrl and right click on the face layer. Then the area of the face will get selected accurately. This step will help us to properly do Photoshop face swap none destructively.
Modify the selection and contract
![]()
Now you will have to modify the selection so that it properly blends with the face of the person in the second image. Always remember that while doing Photoshop face swap it is necessary that the photo blends properly and looks natural. In this image we’ll need to contract or make the selection shrink a bit. To do this go to Select > Modify > Contract. Keep the contract area to 5 pixels and hit ok. Then the selection will shrink a bit.
Choose the duplicate layer and delete the selection
![]()
Now keeping the selection active, click on the new duplicate background layer and press the Delete button on your keyboard. This will delete that area of the face of the new image and will give you an option to create a perfect blend of the image. This is the core part of the Photoshop face swap technique.
Blend the duplicate layer and face layer
![]()
Now the last but the most important step for Photoshop face swap is to blend the layer of the face and the duplicate background layer with no face together. To do this first select the two layers using ctrl and right click of the mouse. Then go to edit > auto blend layers. Whatever you see in the screen just press OK button. Then wait for the images to blend together and see the magic of Photoshop face swap technique.
This is how the final image will look like after “photoshop how to face swap” technique is applied –


