It’s highly natural to take a photo of any infrastructure or object in a different way. Perspective matters from person to person. But not all perspective gets bought buy the customer a photographer targets. Sometimes people want to buy or share images which have a simple perspective.
But, it’s not always possible to click the image of that same structure again using simple perspective. This is when we can take help from Photoshop to change the perspective of the image. Using Warp, Perspective, Scale, etc transformation tools.
Photoshop is like a boon to many designers for removing a background of image, changing the perspective of an image, Retouching skin of the model, etc. It is used for making multipurpose designs.
In this article I’ll show you two different methods for how to use perspective in Photoshop. It will help to change the perspective in your image. So let’s start!
Perspective Warp for Image-1
Open the Photo
Photo editing is blessing to every person who work with photos. I would say Photoshop is a blessing for us as well. Photoshop has made the photo industry very rich by photo editing. As we are doing perspective warp using Photoshop CS5, we need to know how it works. We need to explain from the first before getting into the main work directly.
We obviously have to open the photo in Photoshop at first. There are 2 ways of opening or importing the photos in Photoshop. One is automatic and the other is manual.
If you want to open the photo in manual way, then just go to File>Open and go to the file location where your required file is. Click on the file and click on open or press ‘enter’ to put in the photo in Photoshop. If you want to open the photo in automatic way, it is very simple to do. Just go to the file location on windows/MAC, and drag the photo to the Photoshop bar. Doing that, the photo will be imported automatically. Remember, the Photoshop application must remain opened.
![]()
Duplicate the background
As we have opened the photo in Photoshop, we can now proceed towards our work and move further. As we all know that Photoshop is famous for its different layers. We can add as many layers as we want to. You cannot edit photos liberally if you edit photos in the original background layer. So we need to take a duplicate background layer which will allow us to do every kind of photo editing. So we are going to take a duplicate background layer.
To take the duplicate background layer, go to the layer panel. Look down to the layer panel. You will get to see different icons. Different icons indicate different things. So to duplicate the background layer, drag the background layer to the square icon which is by the side of recycle bin. You will get a background copy right after dragging the main background layer to that icon.
![]()
Active perspective Transformation Tool
There are many tools in Photoshop. The different tool works differently in term of photo editing. There is some best tool in Photoshop for photo editing. Transformation tool is one of the best tools of Photoshop as well. Transformation tool helps you to transform any of the images from left to right, from up to down. In short, it helps to change the entire perspective of your photograph. As we want to do adobe Photoshop perspective warp, we need the help of perspective transformation tool. But we need to active the perspective transformation tool at first.
To active the perspective transformation tool, go to Edit>Transform>Perspective. Doing that, the perspective transformation tool will be activated automatically. There is also a free transformation tool to do that, but that tool cannot give you a perfect result. That is the reason we have chosen to active and to work with the perspective transformation tool.
![]()
Stretch the Lines
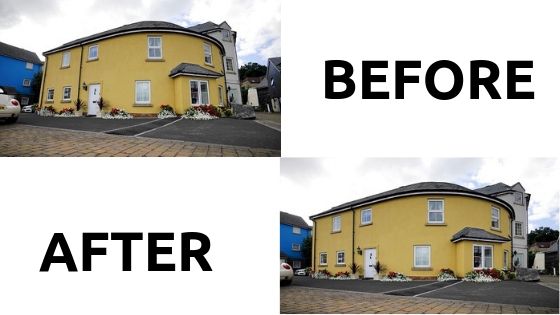
Since we have just activated the perspective transformation tool, half of the work is already done. We have come to the final step of the perspective warp. As you can see some lines over the house, this will now do the work of perspective warp. You can see that the house is not actually looking straight. It is looking like it is a bit laid on the front side. We are going to change that perspective by the help of perspective transformation tool and will make the house straight. This is a very simple thing to do.
What you need to do is stretching the lines. Click on the lines and stretch the lines on as per requirement so that the house gets the straight perspective. Stretch the lines until you get the exact perspective you wanted.
![]()
Here is the Photo Before and After doing Perspective Warp

Perspective Warp for Image-2
Open the Image
Almost every photo editing company use Photoshop for photo editing. We have already discussed in the tutorial we just showed you. This is another method of changing the perspective. Just as like the first photo, we need to open the photo which you want to change the perspective of in Photoshop.
Even this image can be opened in both manual and automatic way. You just have to choose your own way of opening the photo. I usually drag the photo in the Photoshop bar which made the photo opened in the Photoshop screen within a second. Importing photo in a manual way also does not take much time.
![]()
Copy Background
After opening the photo in Photoshop, we can now proceed towards our work and move further. We can add as many layers as we want to. You cannot edit photos liberally if you edit photos in the original background layer. So we need to take a copy background layer which will allow us to do every kind of photo editing. So we are going to take a background layer copy.
To take the copy of the background layer, go to the layer panel. Look down to the layer panel. You will get to see different icons. Different icons indicate different things. To take the background layer copy, drag the background layer to the square icon which is by the side of the recycle bin. You will get background copyright after dragging the main background layer to that icon.
![]()
Active Move Tool
Photoshop is the storehouse of effective tools for editing photos. You just need to know which tool works best and in which way. As we can see that the photo is not straight, we need to make it straight with a tool. Move tool can help us to do that. Move tool is a Photoshop tool which helps you to move any part of the photo and change the perspective. So we need to activate the move tool to do that. To active, the move tool, look at the toolbar. You will see an anchor icon on the top of the toolbar. Clicking that, move tool will be activated. There is another easy way of activating move tool. Press v on the keyboard. That will immediately activate the move tool for you.
![]()
Change Perspective
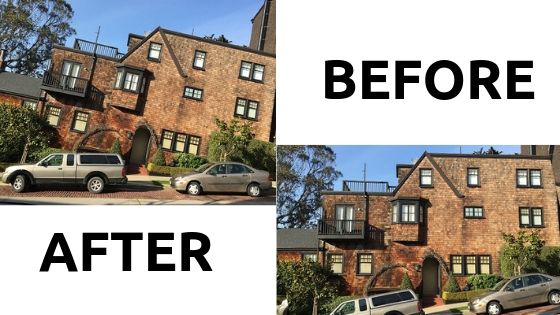
After activating the move tool, you will see a line scale has come around the photo. That will help you to straighten the photo. Just hold your photo with the help of move tool. Click on that and move that to a bit left side since the photo is curved more on the right side.
![]()
Crop Unnecessary Part
We have already changed the perspective of this photo of the building. But still, the photo is not looking convincing enough. There is something wrong. Well, yes! There are some unnecessary element in the photo which is making the photo look awkward. We need to crop the photo and remove those unwanted parts. Press c on the keyboard to activate the crop tool. Crop the photo as per requirement.
![]()
Here is the Photo Before and After doing Perspective Warp

Conclusion
The Perspective Warp tool is very much of a helping hand for Photographers. In this article I am sure that you understood the ways to Use Perspective Warp perfectly. It seems an easy task but the more depth you go the more you will learn more. Photoshop is very friendly for this purpose and with a Photoshop perspective tool plugin you can do this task in a better way for sure. Therefore, use the ways and become the best Photographer.
References –


