There are lots of photographs we see in our everyday life. If you see all the photos closely, I mean very closely, you may find some flaws. Especially, when you see a human model photo on magazine, newspaper, and billboard or online, the model photos are put in a very high margin. Not every photo can be perfect. Sometimes, there may found some problem in dresses, sometimes on faces or sometimes in hairs. The hairs are very much difficult to get the perfect picture of. Sometimes, the actual freshness of the human hairs cannot be shown in the photos. If you want to get the best hair photo on the photos, Photoshop Hair Masking is there to help you.
What is hair masking?
Now let’s talk about masking. Well, masking means separating the object from its background keeping the shape of the object constant. Talking about hair masking, it is almost the same. Masking hair is way difficult because the hair usually remains fuzzy and you will find many spaces in the middle of the hair as well. Photoshop hair masking is the process where you the background of the hairy image get separated while keeping the shape of the hair areas untouched. There are different photomasking techniques to do photo masking. Alpha channel masking works best to do hair masking. If you do not know how to do Alpha Channel Masking,
Here we present to you the Step-by-Step process of doing Hair Alpha Channel Masking.
Open the Image
Editing a photo is not that easy. But if you know what to use for editing the photo, it will be easier for you. Photoshop is the best Photo Editing Tool for editing photos. So to do hair masking, we are going to use Photoshop. To start hair masking process, we need to open the image in Photoshop. At first, go to the windows and open Photoshop application. Without opening the photo you cannot go forward to edit the photo. There are two ways of opening an image in Photoshop. One is manual and the other is automatic.
To open the photo manually click on File>Open. You will get a box of windows from where you can select your desired file from its location. Click on the photo finding from its location and click on ok or press enter on the keyboard. Doing that, the photo will have appeared in Photoshop. To open the photo in automatically, just drag your desired photo from the file location to the Photoshop bar. The photo will be opened automatically. This is a matter of 5 seconds.
![]()
Duplicate the blue channel
As we are doing the channel masking, we have to go to the channel layer now. As we have opened the photo, now we are going to play with the channels. After opening the photo in Photoshop, go to the layer panel. Just right to the layer box, you will find another box named channel. Click on the channel box from there. Doing that, you will get four other boxes down the channel box named RGB, Red, Green, and Blue.
Blue channel is better for masking. So in this step, we need to make a duplicate layer of the blue channel. To duplicate the blue channel, right click on the blue channel and you will get two options named duplicate channel and delete the channel. Click on ‘duplicate channel’. You will get a copy of the blue channel.
![]()
Choose the level adjustment
Photoshop is the powerhouse of photo editing. It has a vast tool which helps to edit photos like professionals. Getting back to hair masking, as we have copied the blue channel from the channel bar, now we have to set the adjustment level of that blue color channel so that we get the proper proportion of the background color. To go to the adjustment level go to Image>Adjustment>Level. Doing that, you will get an adjustment level dialogue box.
![]()
Increase the level of darkness
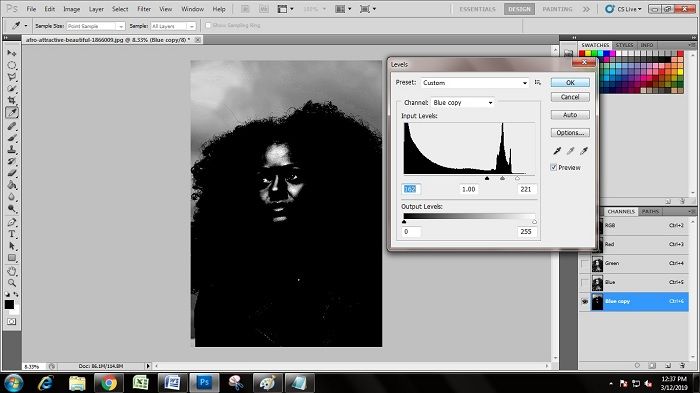
Clicking on the level, we have got a dialogue box containing the sliders. These sliders help to increase and decrease the level of darkness and lightness. Here we are going to increase the level of darkness of the photo which is on the layer of the blue copied channel using the slider. Put the white slider more into the blacker side so that the darkness level gets increased. The purpose of increasing the darkness level is to isolate the background efficiently.

If you like to get the budget of your project, you can use our Get a Quote form.
Use the brush tool
To color black, We are going to select the area from the image using color range. For that purpose, we’ll need to use a black color over the image so that the color range selects the areas which are painted in Black. After increasing the shadows of the image using the levels adjustment you will see that some of the areas of the image still hasn’t become completely dark yet. To make it dark we’ll use a brush tool to color it black. To choose a brush tool go to the toolbar and search for a brush tool. A brush tool looks like a paintbrush. After selecting the brush tool to fill up the area of the image that you want to cut out. These areas are those ones that haven’t become completely dark. In the image we used it’s the area of the model’s face and jacket. Choose a black color on the color picker of the foreground then using the brush color the area of the left out portion.
![]()
Select color range – Hair Masking
As I’ve told you before that we’ll have to use the color range selection to mask out the selected area from the image. To activate the color range selection go to Select > Color range. The color range will help you choose the area of the image which has been painted black. The color range tool basically selects the area that has the same color you’ll pick using the color picker.
![]()
Set the fuzziness to zero – Hair Masking
After choosing the color range selection you’ll get a dialog box. In the dialog box, you can choose the portion of the image you want and how much you want. A fuzziness slider helps you to choose the quantity of the area you want to choose. We will choose zero fuzziness to mask hair in Photoshop. So set the fuzziness level to zero (0).
![]()
Choose the background layer
After selecting the area of the image we want to mask out we’ll need to choose the background layer first because we cannot mask out a portion from channels. To do so go to the layer tab click on the background layer and then you will notice that the background layer will have the hair selection in Photoshop cs5. Now the final task remains; which is to separate the selected area from the background layer.
![]()
Choose layer via copy – Hair Masking
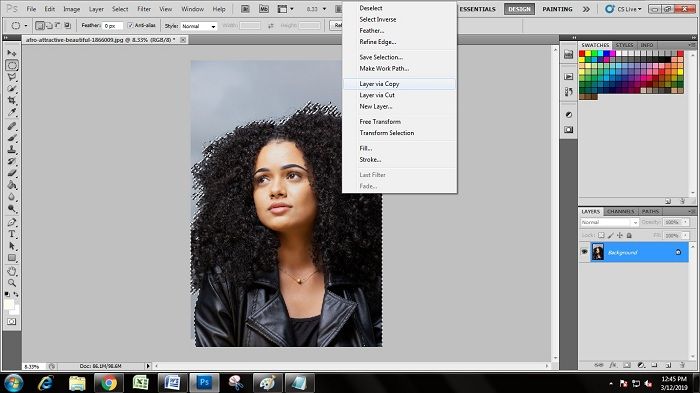
To separate the areas choose a selection tool from the layer tab. Then go the selection area of the image and right click on the mouse. You will see different selection option like layer via cut, layer via copy, etc. We will copy the selected area into a new layer. To copy choose the layer via a select option. Then you will get a new layer which has the masked hair in Photoshop.

This is the masked layer without background
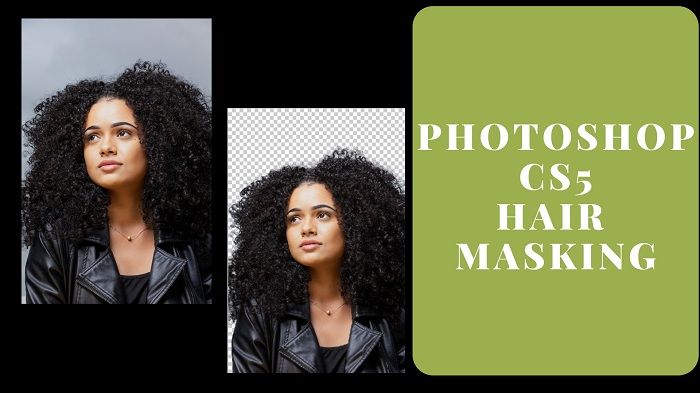
Simply hide the background layer and you’ll get the masked out portion of the image with a transparent background like this image –
![]()
Conclusion
The background of a hair can also be removed using different methods like clipping path, magic selection, etc but Photoshop Hair Masking using alpha channel is the easiest and most time-saving way. Although it may seem very difficult at first but after editing two to three images and masking it anyone can grasp over it. Photoshop is also a great tool for doing such difficult tasks easily. I recommend using newer versions like Photoshop CC. Then it will feel easier. The new Photoshop has better tools and advanced features.


