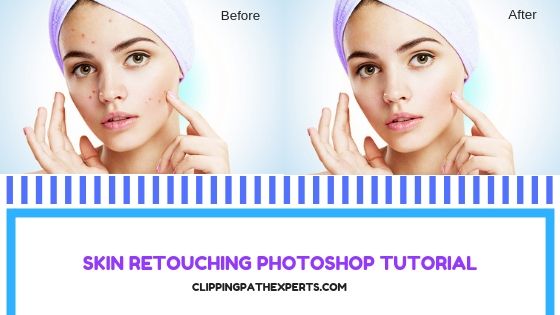
One of the most important factors that affect the work of a Portrait photographer is the skin of the model or subject. The photographer thrives to achieve a smooth skin of the subject, that too without any flaws such as dark spots or circles.
After capturing portrait photos the photographer carefully selects the best ones and sends them to the editors or uses the help of some top photo editing services around the world.
The service these photographers mostly use is the skin retouching service. Sometimes outsourcing becomes too much cost for a photographer if he has just started or entered this market.
Therefore, in this article, we’ll show you the steps using which a Portrait photographer can easily retouch the skin of his models using Photoshop. Most importantly, he can do it all by himself.
So without further ado, let’s start!
Open the Image:
The first step is obviously to open the image in the tab of Photoshop CS5. There are two different ways of opening an image in Photoshop.
The first way is to go to the File > Open. Then you can upload any photo you want to edit from your PC.
The second way is to drag the image from your PC directly into the Photoshop tab using your mouse.
After Opening an Image you will see a new layer on the layer bar. This will be the background layer of the image. All the edits we’ll do on Photoshop will affect this layer.
![]()
![]()
Create a New Layer:
Next step is to create a new, fresh and transparent layer. We’ll do all the skin retouching on this layer. We’ll simply remove the spots using this layer.
To open a new layer, go to the layer bar and you will see a square-shaped icon on the bottom of the layer bar. Click on that icon and you will see that a new transparent layer will appear in the layer bar.
![]()
Choose the Healing Brush Tool:
Now, without a tool, you really cannot remove the spots from the face. There are so many different tools that you can use in Photoshop to remove the spots. So, The question is “Which tool should you choose?”.
You can choose the spot healing brush tool or the healing brush tool. But, I prefer the healing brush tool. Healing brush tool gives a better finishing to the spots removed than the spot healing brush tool. So, Healing brush tool is what we’ll choose here.
To select the Healing Brush tool, you will have to go to the toolbar and then look at the middle. In the middle of the toolbar, you will see a bandage shaped icon. Right, click on that icon. Then from the option choose the Healing brush tool.
![]()
Using the Healing Brush Tool:
Now the main task starts, which is to remove the spots from the face using the healing brush tool. But first, you will need to know how the healing brush actually works.
It is very easy. You just have to select a source point or in other words the area you want to copy for hiding the area you want to hide.
Selecting the Source Point:
Here, the areas we want to hide are the spots. To hide the spot we need to copy an area from the skin where there are no spots then we’ll just paste it on the spots. To choose the source point Click Alt + Left mouse button and choose the point that has no spot.
![]()
Removing the spots:
After selecting the source point you will have to remove or hide the spots using the tool. Keep in mind that all the work you’ll do should be on the new transparent layer we had created before.
Now simply use the mouse and right-click on the points where there are spots. Then you’ll see that the spots are getting removed from the skin.
![]()
![]()
Getting rid of the other issues on skin:
There are still some flaws in the skin of the face that needs some spot or shadow removal. These flaws maybe dark circles, blackheads, etc. To remove such issues from the skin we can again use the healing brush tool the same way we did before. But, here we will have to create a new layer. This layer will be the copy of the background layer so that it doesn’t harm the spot removal we had done before.
To copy the background layer go to the layer bar then right click on it, then choose duplicate layer option from the drop-down menu. Thus, your background layer will get copied.
![]()
![]()
Create Clipping Path over the face using Pen Tool:
After removing all spots from the skin now we just have to brighten up and fix the skin tone using different adjustment tools. But, for that, we’ll have to draw paths around the face using a pen tool.
To choose pen tool go to the toolbar and select the tool that has a pen icon on it. Then by using it draw paths over the face and after connecting all the paths, it’s time to select it.
![]()
Path selection:
After drawing paths now you will have to make a selection. This will help you to use adjustment layers properly on the skin.
For path selection, you will have to go to the path layer and right click on it, you’ll see a selection option on the menu. Choose that option and your path will be selected.
![]()
Use the Adjustment layer:
After selection, we need to use adjustment layers to adjust the brightness and contrast of the face. For this, we’ll use the brightness and contrast adjustment layer.
To open this adjustment layer go to the layer bar and then look at the bottom area you’ll see an icon with a circle that has black and white. Click on that icon and then choose the brightness and contrast layer from the options.
![]()
Use sliders to adjust:
Now, you’ll see the slider that says brightness and contrast. Using the sliders adjust the tone of the image. Sliding right means increasing and sliding left means decreasing.
![]()
Conclusion:
After editing you’ll get a final image that looks like this. You can see that how the skin has been perfectly retouched into something different and much better than before.
Therefore, in this way you can easily use the skin retouching technique to fix and remove spots from any sort of images.


